Monday, May 28, 2012

Quilt-A-Long

Yea, I am doing a quilt-a-long. Why? Because I am slightly crazy and have not had my fill of quilts just yet. Plus both of the ones they are doing I wanted to try, so why not sew with them, right? Sure...
Here they are.


(hehe, I figured out how to put a button IN my post. I feel smart for a whole second)
I want to do the ruffle quilt, but don't want to spend money on that much fabric. So, I will probably do the zig zag quilt and re-figure it to match something I already have. Yup, that's how I roll.

Thursday, May 3, 2012

Quilts on the Brain

Wow, this new blogger style is really messing me up. I can't figure out how to move stuff. Sad because I am really excited about these quilts! They were keeping me up at night, so I had to finish them quick!
Rome's Driving Duvet Quilt
I started with this duvet cover I got for Rome. It was huge. Queen size for his twin bed. I have a queen size comforter I put in it, but it was just too big. So, I decided to cut it down and make it a blanket on its own. I measured, cut, sewed it inside out, turned it and put in the batting.  Turns out Duvet covers are not true to size and have a little lot of extra room for the comforter inside. So, when I went to pin it, it was way bigger on the back than the front. Oops. Oh well now. I flattened it out as best I could, pinned it and proceeded to quilt the edges (in red, green and yellow) and around the roads on the back side.
 You can't really see the edging or the quilting. I thought about doing colors in the middle, but after doing some in white, just stuck with that. It was hard! The roads are mostly straight, but then you have to turn the corners and figure out how to stuff the whole quilt through the machine. I also don't have quilting pins, so I was being stuck the entire time with regular pins. AND I worked on this while the kids where playing outside, so they kept coming in and laying on it while it was on the table. (Rome kept trying to drive his cars on it while I was still sewing. Sooo helpful) I had to keep warning them that it still had pokeys in it, so please don't touch! I got poked a LOT. I was so happy when this was done. It has been sitting on my shelf for months and I was tired of being poked by pins!
You can see the quilting a little better here. This is after Rome played on it for a while.  He thought it was pretty cool to jump and roll on it for about an hour. Hopefully he will still like it when it gets cold enough for a blanket on his bed.
Now I need to think about what to do with the extra piece. It is only 20" wide by 90" long, so not wide enough for a pillow case. Still it is super cute cars and roads. Maybe it will end up in a quilt somewhere else. I think 10" squares would work. Hmm...
Next, Flowery Stripes Quilt.
I started with a fleece blanket I got for Capri. I never liked it and never used it. Not even once. I thought it would be perfect to turn into a quilt. I took it with me to the store and got some fat quarters to match. It was tough, they are kinda weird colors. Then, I tried to decide what pattern to make it. I didn't want squares and I only had 3 colors, not 6 or 10. I ended up liking a kind of stripey pattern. 

All pieced out
Ready to quilt
It is pieced together and a little TON more difficult than I expected. I used the scraps of the sheet I cut out for the Rocket Ship Rainbow quilt below. What I didn't realize is that it is not a cotton sheet. It is a knit. Kint = s t r e t c h. Yikes. I did not see that one. As an added bonus, my fleece is very thin and stretchy too! Oh My Goodness, this was hard to put together! I measured and calculated and contemplated.  Finally, I cut out my strips and started sewing it together only to realize that I was going to run out of white sheet for the strips. (notice how some are missing in the picture) Eek. I stretched out what I had left and came up one strip short.  Then, I laid out the quilt and saw how crooked it was. I didn't take a picture because it was very depressing. The side I was planning on not cutting because it should all line up was at least 3 inches off. Ouch. Anyway, I squared it all up and took the scraps and sewed them together to get my last strip to finish the top. Phew! 
On the back, I took my last three strips of colored fabric and striped them to put an extra piece down one side. I thought it would look nice. When I tried to sew it on however, I realized just how stretchy my fleece was. Greeeeat. I sewed it on and just hoped it was straight enough. I finally got it all together and decided to quilt it in straight lines. I sewed down the middle of each strip too, just to help with the extra stretch. I thought it would help with the shifting if I sewed one way and then the other. So, if you look close you can see the pull of the stitching  from the "ditch" to the middles. So Fun I Tell Ya! (just FYI, sarcasm is part of my vocabulary) I turned the edges and sewed them down and I was done!  I washed it up and it is so soft and cozy!
For all of the trouble this quilt caused me, it actually came together pretty quick. There was a couple days in between for contemplating what I wanted to do, but the actual piecing and quilting only took 2 or 3 nights work. So, 6 hours, maybe? Not bad considering and it turned out pretty cute. 
I actually like this blanket now. Capri does too. I thought about giving it away, but I might keep it around for a while. 


Rocket Ship Rainbow.

This one went a completely different direction than I had planned. I started out wanting to find fabric to put a top on a cream colored fleece blanket I have lying around. What I found was 5 fat quarters in rainbow colors. I liked them so much that I went back to the store to find a back to match! I saw the rockets and it was perfect! As a bonus, Rome saw the rockets and was in love! (For me! Can I play with it? Please!) Awesome, rocket ships for Rome.


I cut out the sheet I was planning on using to the right size and picked out a general pattern. I cut the rectangles to 6x9's and 6x3's. Originally I laid it out like this first pic, and I liked it okay. The rainbow effect was cool, but when I went to put it on, I just didn't fit right. So, I changed it up. I figured out what I wanted, cut it all out and used the extra for the back. 


The back was supposed to be easy. It had other plans. I sewed my stripes very carefully to get the length I needed. I used the very few extras to make my 42" fabric into the 46" I wanted. Then, they didn't match up, either one of them. Arrgh! They were both at least an inch off. Don't freak out Jocie! Just work it out. Okay, so I cut an extra strip for both of them. I put one on both sides of the rainbow colors, and had to add another anyway. bleh. Finally I got them all to 46" and sewed the back together. At this point something in me decided that I needed to wash my fabric. Yes, I did a big "no no" and did not prewash my fabrics. Sorry Grandma! I was taught better I promise. So, I washed it, dried it, sewed the sheet on, turned it inside out, added the batting and saw the damage. Yea, the rainbow stripe is now a bit smaller than the rest of the quilt back. Lucky I spent so much time adding those extra inches huh. I got it as flat as I could, stitched it closed and edged it on all sides. Time to sew on the rest of the rainbow.  I washed the squares I had cut, trimmed the edges that frayed and checked out what I had left. The rectangles weren't quite square anymore and some were quite a bit smaller than they used to be. Special. That is what you get for not following the rules and prewashing your fabric. I put all my pieces on, glue sticked them down and decided to zig zag them on. (no pins, thank you!) I went down one side and came back the other and tried not to notice when it was very not straight, stretched and puckered. I kept reminding myself that this is for a 3 (almost 4) year old and  He Does Not Care. He probably doesn't care if there is a rainbow on the other side of the rockets at all. Or that a few of my large rectangles were already cut smaller and had to be sewed back together.  In the end it turned out okay.  I totally planned it that way you know. 
Awesome Rocket Ship Rainbow Quilt Finished.


Friday, April 20, 2012

Crafty Day

First up. I have had these around for a long time. Like 3 years. I always meant to hang them up in the cute nursery, but it never happened. Well, Baby Girl likes to play with them sometimes and it drives me nuts. So, finally I decided to make it happen! I was feeling crafty (and she found them again), so I got the kids and knocked it out.
A glue gun and some ribbon is all it takes.
I ran out of ribbon, so the ladybugs are kinda short. Oh well.


All hung up. Looks just how I imagined. Yay!
Secondly, I decided to make cookies with the kids. I looked up egg-free cookie recipes and stumbled on this blog post about making cookies in a bag. Cool, we can do that. I put the ingredients in the bag, with some help of course, and let them squish away.
Looks like fun right? Yea, they lost interest pretty quick. It turned into a hand work out for me. So, I put it in a bowl to finish mixing and cooked them up. I let the kids taste the dough (it is egg-free so why not). Capri loved it. No surprise. Rome hated it! Actually spit it out. Funny kid, has some texture issues.
All cooked up.
Pretty tasty-tasty. I think Rome didn't like the gooey center of his cookie, so he crumbled it and ate only the outside. Fine with me, I can finish that for you buddy! The rest of the cookies were eaten by Mom and Dad anyway. Daddy loves chocolate chip cookies, and I just don't give my kids sweets that often. Especially when they don't finish their dinner, which is often.
And what is crafty day with out a little Batman action?
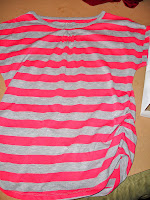
Next up is this shirt I got at the Dollar store. I know, great place to find cheap clothes. It is super big and I thought it would be great for my coming summer huge-ness.
First, I put some ruching elastic down the sides.
Then I gathered a section at the neckline and sewed it about 2 inches smaller. It was just a little too wide at the top.
Then, try it on. Looks okay now, but I bet by July it will be so comfy!
Last, this super cute looking maternity-already dress.
I have had this dress for a while. My sister actually got it for me when I was expecting baby #2. Yea, so, 2 1/2 years ago? I never wore it. It looks comfy and cute, but just doesn't have enough room for my chest, so it looks funny. I figured I have been doing this altering stuff, I could fix it no problem. Just put a black sash around the middle. I got out my seam ripper and before you know it, had a huge hole in the front of my dress. All ready to...do what? Just putting a sash isn't going to give me more room for my bust. It would just cause the same problem I had before. A huge seam across them middle of my (ever larger) bosom. I just can't handle that. It looks weird. Well, this one might take a bit longer than anticipated. I will have to think about it some more.
On the plus side, I got all of this stuff done while my kids were awake! And finished four projects in one day. Amazing!

Monday, April 16, 2012

Modify

I have been working on lots of projects lately. Quiet books (not finished), summer maternity shirts, maternity dresses, super capes to give away (not even started), finally hemming 3 or 4 pairs of pants. Yea, keeping busy. My current obsession is to alter clothes to fit my belly and be more modest.
First up, some t-shirt I found at Old Navy on clearance. I thought they would be perfect with some elastic on the side seam.
I measured one of my favorite Motherhood Maternity shirts and tried it out a couple of ways.
I think it turned out pretty good.
Except I wanted to put some ruching on the sleeves too, to make them shorter and cuter. That didn't work so well and isn't finished yet. I better hurry though, they might not fit soon. This belly just keeps growing on me.
Next up is this halter maxi dress I bought for $10. It is supposed to be a maternity dress, but it fit a little funny. I was going to just cut off the back twisty part that was too tight, but then I started thinking. It was way too long. So...
I started by cutting 12" off the bottom.
Then I cut one halter front off to switch it to the other side that I liked the pattern better. I unpicked the elastic out of the waist. Sewed on a back panel. Looked up how to make a sleeve pattern and cut out a mock up out of black fabric. Sewed, unpicked and modified the sleeve, sewed, unpicked, gathered, and re-sewed the sleeves back on. It didn't really have a sleeve opening, so it was a bit harder than I anticipated. It took a while, but I figured it out.
The last thing to do was to put in a modesty panel so I could wear it without a tank underneath.(oh, and sew the waist elastic back in) I first followed the shape of the front to make the panel, because one side is wider than the other. (because I flipped it over) However, it was too wide and I had to wear a tank underneath anyway. (I wore it for Easter) I fixed it later and it looks great!
Hubby says it isn't very flattering, but it is a maternity dress. They aren't really made to be flattering. It is however very comfortable and light enough to wear all summer. Yay!
Almost last project, this dress I got in Europe in high school.
Yes, its that old. I still love it though. I have had it on my project list for a while because the back slit is just a little too high now a days. So, I put in a little modesty kick panel.
I did this after the much harder Easter dress and thought, "Hey, I can put sleeves on this one no problem." Actually, I even used the sleeve mock ups that I cut out for that dress. Since they were regular sleeves and in the fabric that was the same black polyester stuff this dress is.
I think it turned out pretty good too. I hope it fits later when I can actually fit into it.
Now onto the last maternity shirt to be ruched and finish the sleeves on the almost finished ones. Almost done, right? Never...

Sunday, September 25, 2011

Halloween 2010

Let me start with I LOVE Halloween. It helps that my husband likes it too. I like Christmas, but what other time can you dress up as whatever you want, have your friends over and eat lots of candy?? Yea, its pretty great. I also like matching costumes. 2008 we were cave men and baby boy was a dinosaur in blue jammies I sewed green spikes and claws onto. I might have to go dig out those pics, he was so cute! (and I hand sewed a lot)
Look at how little he was! He loved to chew on the soft "claws".
you can kind of see the spikes and tail I sewed on.

This year I settled on race cars. My little boy LOVES the movie Cars. He could watch it all day long and sometimes on car trips he does. So, I decided to make him a Lightning McQueen costume out of a cardboard box.
It turned out pretty sweet and He loved it. Still does. And so does baby sister.
Yes, I freehanded all of that, though I did have a lot of models to look at. Painting was a bit hard over the tape keeping it together. Maybe duct tape would have been better, but too late now. I even cut out wheels and screwed them on so they would turn. So cool! Until some little boy decided to rip them off. Arrgh! Don't you know how much time I put into that stinkin' cute costume?!? Okay, you're two, you don't. Also, I got some black and white fabric and sewed it down the arms of a red t-shirt so it looked like a racing outfit. Not an easy task. I ended up only sewing 2/3 of it on because my machine wouldn't reach any more and I did not want to hand sew it. I liked the effect anyway. (and you really can't tell)
Next was the trophy. I came up with this on my own. It looked really good in my head.
I bought a yellow t-shirt at the dollar store and cut it up to look like an upside down dress. I gathered both ends and then on one side I put in a pocket for some boning to keep it open. then I cut open some arm holes and sewed on the trophy "handles". I even put on some snaps to keep the top closed. It turned out okay. It should have been way bigger. Not my best work, but you get the idea.
And yes, there is me, looking badly. I was the "Trophy Wife" in a pink sweat suit, heels, huge fake ring and I used to have on a fluffy blond wig. Baby girl cried because she didn't recognize me, so its gone. I went with Hubby as "Ricky Bobby".
Yup, pinned on those pieces of paper myself. I like the "Wonder" symbol on the piece of bread. Clever, I know. I tried to get him to let me doctor up his overalls more, but He wasn't having it. Oh well. At least he went with the theme.
And to go with our Halloween feast, cake eyeballs. Yes, the idea came from Lacey last year. Hers were way more pretty. Ehh, I had two little kids at the time. I was lucky to get anything done. They tasted good anyway.